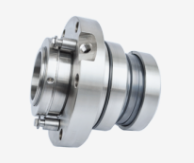
Emergency Guide: What to Do When Your Mechanical Seal Is Leaking Excessively
Date:
2025-09-20
Emergency Guide: What to Do When Your Mechanical Seal Is Leaking Excessively
The mechanical seal is the heart of your pump's sealing system. Its job is incredibly demanding: to keep the process fluid in and contaminants out, all while withstanding pressure, temperature, and often abrasive slurries. A small, controlled weep is normal for some seals, but a severe leak is a five-alarm fire. It creates safety hazards, environmental issues, costly fluid loss, and can quickly destroy the pump itself.
If you see a steady stream or heavy dripping from your pump's seal area, don't panic. Follow this structured approach to diagnose and resolve the issue.
First, STOP and Think: Safety First!
Before you do anything, assess the fluid that's leaking. Is it hot? Corrosive? Toxic? Abrasive? Ensure you are wearing the appropriate Personal Protective Equipment (PPE) – gloves, goggles, face shield – before investigating further. If the fluid is hazardous, follow your plant's lockout/tagout (LOTO) procedures immediately.
The Step-by-Step Troubleshooting Guide for a Severe Seal Leak
Step 1: Initial Inspection & Immediate Checks (The Simple Stuff)
Often, the problem is external and easier to fix.
Check the Seal Flush Line: Is your flush line (e.g., Plan 11, Plan 32) clogged or closed? A blocked flush line starves the seal faces of lubricating and cooling fluid, causing them to instantly overheat, crack, and fail.
Solution: Verify valves are open and lines are clear.
Listen and Feel: Is the pump cavitating? Cavitation sounds like gravel rattling inside the pump. It creates violent vibrations and pressure shocks that can literally shatter seal faces.
Solution: Check suction valves, filters, and fluid levels to ensure the pump is getting enough fluid.
Review Recent Work: Was maintenance just performed? A severe leak right after a repair often points to an installation error.
Step 2: Common Causes of Catastrophic Seal Failure
If the simple checks don't solve it, the seal itself is likely damaged. Here’s what probably happened:
1. Incorrect Installation: This is the most common cause of early seal failure.
The Problem: Mistakes like forgetting to lubricate O-rings, installing seals backwards, damaging delicate seal faces during handling, or having incorrect spring compression (setting the seal too tight or too loose).
The Sign: The seal fails almost immediately upon startup.
2. Run Dry: Mechanical seals need the pumped fluid to lubricate and cool the finely polished faces. Running the pump without fluid, even for a few seconds, generates immense friction and heat.
The Problem: The seal faces warp, crack, or glaze over, losing their perfect, flat seal.
The Sign: You might find blistered, cracked, or burnt-looking carbon faces.
3. Chemical Attack or Abrasion: The seal materials are incompatible with the fluid or the abrasives in it.
The Problem: O-rings swell, shrink, or dissolve. Elastomers get hard and brittle. Abrasive particles embed themselves into the softer carbon face, acting like a grinding wheel against the harder ceramic or silicon carbide face.
The Sign: You'll see unusual wear patterns, pitting, or deteriorated elastomers.
4. Clogged Seal Chamber: In slurry services, the area around the seal can fill with solid buildup.
The Problem: This buildup can prevent the springs from flexing, lock the pusher collar in place, or cause excessive wear on the elastomeric bellows.
The Sign: The seal is physically jammed and cannot perform its axial movement.
Step 3: The Repair Process - Doing It Right
Fixing a severely leaking seal isn't just about replacing a part; it's about fixing the reason it failed.
Disassembly: Carefully remove the old seal. Take pictures during disassembly to aid in reassembly.
Inspection - The "Autopsy": This is the most critical step. Lay all the parts out on a clean bench.
Look at the Faces: Are they cracked, chipped, or worn unevenly?
Check the O-rings: Are they swollen, brittle, or cut?
Check the Springs: Are they clogged or corroded?
Measure Everything: Check the seal chamber for bore, depth, and squareness.
Identify the Root Cause: The damage tells a story. A cracked face suggests dry running or thermal shock. Uneven wear suggests misalignment. A swollen O-ring indicates chemical incompatibility.
Replacement and Reassembly:
Cleanliness is Key: The seal area must be spotless. A single grain of sand can ruin a new seal.
Use the Right Parts: Ensure the replacement seal and elastomers are correct for your specific fluid, temperature, and pressure.
Follow Instructions Precisely: Lubricate O-rings with the correct fluid, set the seal to the manufacturer's exact installation dimensions, and tighten gland bolts evenly.
An Ounce of Prevention: How to Avoid Future Leaks
Never Run Dry: Implement dry-run protection sensors if it's a recurring risk.
Train Your Team: Ensure everyone who installs seals is properly trained on the specific model.
Consult Your Supplier: When in doubt, talk to your seal or pump manufacturer. They can help you select the right materials and the best auxiliary flush plan (API Plan) for your application.
Conclusion
A severely leaking mechanical seal is a serious problem, but it's almost always a solvable one. By methodically investigating the cause, performing a careful "autopsy" on the failed seal, and executing a precise repair, you can not only fix the pump but also prevent the same failure from happening again.
Need help diagnosing a stubborn seal problem? Our technical team is ready to help you analyze the failure and get your operation back up and running safely and efficiently.

Keywords:
Related News
Why Is Your New Slurry Pump Underperforming?
2025-09-22


